 If you have tried to format your pictures using our Photo Wizard, you might have noticed a slight variation between what you see on your screen and the final print that our Photo Wizard sends you.
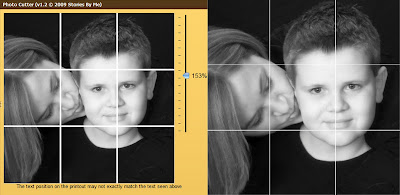
 Here's the screen version. Formatting pictures for the puzzle can be tricky because you are trying to keep the 4 lines (nine sections) from dissecting important parts of the picture. I scaled the picture to 153% to fill the frame to my liking. The position of the faces look OK too. Notice how the right line falls to the left of the boy's eye and near the bottom of his chin?
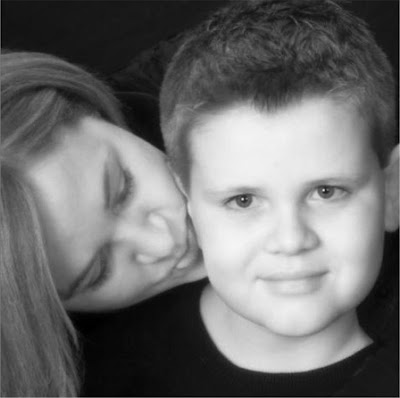
 The above image shows the picture as it comes back from the Photo Wizard. WHAT? The line now runs down the center of the boy's nose and near the bottom of his lip. That's no big deal, but one of the other lines (the line that you CUT!) now runs through the mom's eye. That is a much bigger deal (partially because it's MY EYE!) Seriously, we've helped more than a thousand of you create these works of art. It's no big deal to cut through an ear, forehead or cheek, but cutting through someone's eye is somewhat disturbing as it distorts the entire face.
 Our programmer tells us that this is due to the fact that we are viewing the image on our screen, but the software formatting the picture actually resides on a server several states away. Because of the myriad of computer monitors, not to mention all the varieties of possible settings, our software has to make some assumptions as to what you are seeing.
 Knowing that the Photo Wizard sees things slightly to the left and down from what I'm seeing, I simple pushed the picture up a little and to the right of where I wanted the final line to reside.
 I now have the perfect layout for the puzzle project. This cute picture was from a family photo shoot a couple of years ago. I'm actually whispering into the ear of my son during the session, telling him to knock off whatever shenanigan he was up to. The photographer captured the moment and it's ONE of my favorite pictures!
Other projects are much easier to layout. Here's the ornament project...
 Notice that a smidgen of the ear is missing. Not a big deal as I know that I'll be sanding that edge and distressing it with ink as I finish the ornament. If I wanted to, I could apply the same process of pushing the picture slightly to the right to get the entire ear in the window.
 Keep in mind that you can only have ONE active print job in your account at a time. If you decide to reformat your pictures and repress the Print button, you'll get the following message:
 If you think you MIGHT want to use that previous layout, save a copy of the file to YOUR COMPUTER. (Saving a copy of the email doesn't help, it only provides the link to your file!)
Now you know!

No comments:
Post a Comment